Friday, July 31, 2015

Accessorizing Your Room: Mason Jars

Today on accessorizing your room, we are painting mason jars for your desk or bed side table! I did this craft last year so I don't have step by step pictures but, I can just tell you how I did it. It is super easy!!

Materials You Will Need:
Mason Jars
Paint
Paint Brush
Tape

For the first jar, I taped off half of it and paint the bottom neon yellow! I know for this color I needed to do 3-4 coats of paint for it to be this bright and smooth. But, once it is dry the first jar is done!


For the second jar, I painted the inside of the jar so you wouldn't feel the paint on the outside! All you have to do is squeeze a lot of paint to the bottom of the jar and flip it over so it covers the whole jar. Let it dry and your done! Super easy right! Haha


Than I put tape across the top so the flower would stand up straight and not fall out!


As you see here!


Here are my mason jars in action, looking cute on my desk!! 


I would love to see your pictures if you do paint mason jars! Tweet me @fashionx16

Once I move into my new dorm room I will blog pictures of what all of my decor looks like together!

Hope you Enjoyed!

-Kara

Thursday, July 30, 2015

Accessorizing Your Room: Gold Lights

Hello, today on accessorizing your room we are spray painting Christmas lights to add some light and  pizzazz to your room!


Materials You Will Need:
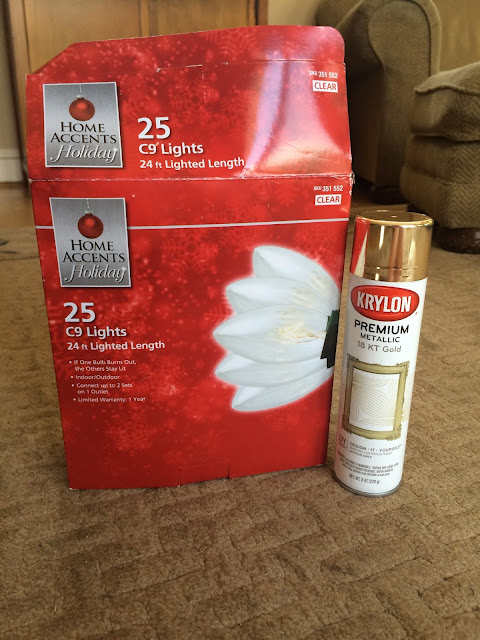
Christmas Lights 
Gold Spray Paint
Newspaper


First, take out all the light bulbs and stuff newspaper in each one. Cover the plug to the outlet with tape so the spray paint doesn't get on it. 


Go outside, put newspaper down and spray away!


Make sure you get flip the lights over so you get all the sides gold. 


Now I didn't wear gloves but I advise you to so this doesn't happened to you! Hahah!


Let the paint dry and put the light bulbs back in!


Hang up in your room and you are all done!


I would love to see your pictures if you do spray paint your lights! Tweet me @fashionx16

Once I move into my new dorm room I will blog pictures of what all of my decor looks like together!

Hope you Enjoyed!

-Kara


Wednesday, July 29, 2015

Accessorizing Your Room: String of Flags

Today, on accessorizing you room I am going to show you how to make a string of paper flags to hang up in your room!


Materials you will need: 
Scrapbook Paper
Twine
A Ruler
Hot Glue Gun


To start, fold your scrapbook paper in half and draw triangles on one half of the paper. 


After that cut out the triangles, you are going to end up with eight of each color. 


You will need to make a flap to fold over the twine and glue. I measured a half of an inch off the top of each triangle so they would be even on the twine.


I used the ruler to make the crease nice and straight. 


Than cut off the extra paper hanging off 


And this is what all the triangles/flags will look like!


Once you are done folding and cutting the flags you can glue them onto the twine!
Give each flag some space in between so it will hang well. 
This is what it will look like! 


Now you are ready to hang up your string of flags!


I would love to see your pictures if you do make a string of flags! Tweet me @fashionx16

Once I move into my new dorm room I will blog pictures of what all of my decor looks like together!

Have Fun Crafting!!

-Kara


Tuesday, July 28, 2015

Accessorizing Your Room: A Framed Quote

Hey, today on accessorizing your room we are doing a framed quote for your wall!


Materials you will need: 
Sticker Letters 
A Frame
Card stock Paper 
Optionally- Background Paper 


This is optionally but I think it adds more to a simple quoted frame! 
To make the background border:
Put the frame in the middle of the picture you picked and measure how thick you want it to be. 
I did two inches all around the frame. 
Draw the outline of the frame onto the background picture. 


If everything is all measured and outlined, it's time to cut out the border and the frame outline! So, it will look like this. 


Now for the quote part:
Pick out what quote or motto you want 
Center the words/letters onto the card stock paper.
Then I created lines so I would know that the letters would be even and straight. But if you have a good eye/hand go for it, do free handed! haha
Once everything is lined up you can stick on all of the stickers! 


Here is the finished product! 


I love how it came out! 
There is so many different variations you can do here, so have fun with it!

I would love to see your pictures if you do create a framed quote! Tweet me @fashionx16

Once I move into my new dorm room I will blog pictures of what all of my decor looks like together!

-Kara

Monday, July 27, 2015

Accessorizing Your Room: Upgrade Your Frames

Today, on accessorizing your room is an easy fix to brighten up your room and change things up! 
Upgrading the black frames already in your room to white!

Material you will need: 
White Paint
Paint Brush 

These are the black frames I had in my old dorm room 


Take the frames out of the glass 


Paint them white! Wait 15-20 minutes in-between each coat and do 3 coats. Wait about 30-45 minutes after the last coat. 


Once it is completely dry, put the glass back in. 


And your done! White frames!!

Of course you can do any color you want to match your room! 

Once I move into my new dorm room I will blog pictures of what all of my decor looks like together!

-Kara

Sunday, July 26, 2015

Accessorizing Your Room: Wooden Letter

Hello everyone, I noticed I haven't done a DIY in a while and I'm doing a lot for my new dorm room. So, I thought I would make a series out of it and call it accessorizing your room!  Today, I will be showing you how to make a cute wooden letter to hang up in your room! I already have one that's why you don't see a K but I'm making these letters for my roommates!


The materials you will need: 
A Wooden Letter
Paint/Brush
Fake Flowers
String or Twine
Hot Glue Gun


Paint each letter your choose of color. Wait 20-30 seconds in between each coat and do 2-3 coats. Wait about 30 minutes after your last coat before doing anything else. 


Once the letter is dry, have a variety of fake flowers to choose from and this is where you can get very creative.  Work with different colors and different placements on the letter to get it how you want it!


Lay out the flowers how you want it before you glue them down cause you might want to change it half way through. So, make sure you love it before you do any gluing. 


After you glue down the flowers than you can glue down the string or twine to the back of the letter and make a bow at the top!


And you are all done! You have a super cute letter to hang in your room!


So easy and so adorable! If you do create a letter, tweet me a picture @fashionx16

Once I move into my new dorm room I will blog pictures of what all of my decor looks like together!

Hope you enjoyed!

-Kara


Thursday, July 23, 2015

My New York Trip

My mom and I decided to take a mother-daughter trip with my friend and her mom to New York City. We had a blast and I took pictures of everything we did and I would like to share!

First thing we did when we got into the city, was go to the Madame Tussaud's Wax Attraction on W 42nd St. I have to say it was amazing seeing all these celebrities in wax form, they looked so real! Here are just some of the pictures I took!


 Getting interviewed by Jimmy Fallon!


High kicks with the Rockettes


One of JT's show girls


After having a lot of fun at Madame Tussaud's we walked over to Hard Rock for lunch. It was so delicious, I recommend getting the bruschetta as an app! 


 We than headed to Rockefeller Plaza.  Behind me are the famous ice rank you see in all the Christmas movies. This area is also where they tape the Today Show and Fox News. 


Button Down- Similar
Shorts- Older Post
Sandals- Similar


 We went shopping around Rockefeller Plaza. We ended up in this huge Anthropologie and I had to take a selfie.


I did a report about Bergdorf Goodman in one of my fashion classes last year. I just had to go and experience the seven floors of high-end designer products. It was a fashion major dream to actually see the designer's that you have been studying clothing in your hands. To feel real fur and to see how much one can cost! Everything I learned in the classroom became real life at Bergdorf's. I would love to one day go into Bergdorf's and be able to afford a pair of designer shoes!


After Bergdorf's we were all exhausted of walking, took an uber back to Grand Station and got on the train back home!

Over all, I had so much fun spending the day with my mom, my friend and her mom in New York City. I can't wait to go back and explore some more!
-Kara 


Tuesday, July 7, 2015

Clinton Outlets

Over the Fourth of July holiday weekend, my sister, mom and I went on a little shopping trip at the Clinton Outlets. Going into to this I said to myself, "I'm not going to buy anything" in my head I was just going to hang out with my mom and sister. Needless to say I ended up buying more than expected! I should have guessed, obviously I would buy stuff! I'm me haha I shop till I drop and I never drop! Lucky for me we went to the outlets, my favorite place because there are always awesome sales!

The first store we went to was Polo Ralph Lauren. Here I got two plain striped v-neck shirts. Why I got two striped shirts I don't know! I loved them both and they were 50% off and when I got to there register they gave me another 25% off! So each shirt costed me ten bucks! Score!


Next we went too J. Crew my favorite outlet store because I can never afford there clothes full price!
I got these great distressed white boyfriend jeans original at $88 found on clearance for $49.97 than was another 50% off. Brought them for $24.98!!!


Finally, we stopped into Ann Taylor where I found this super cute black jumper on clearance for $24.99 original price $49.99. Also, shorts were on sale for $24.99 original price $54.99!

This looks super with heels, I promise!!


Yes, I have a shopping addiction but I'm okay with it!

Hope you enjoyed!
-Kara

cookieassistant.com